croissant
Legend has it that the croissant originated in the late seventeenth century, when the city of Vienna repelled an invasion by the Ottoman Empire.
The invading Turks dug tunnels in an attempt to infiltrate beneath the city walls. A baker working the night shift raised the alarm. To commemorate the victory, bakers began making crescent-shaped pastries – the crescent being an emblem on the Turkish flag. In reality, these Austrian pastries, known as kipferl, had existed long before the Ottoman siege of Vienna.
It is also said that the pastry was introduced to France a century later by Queen Marie Antoinette, wife of Louis XVI, who was Austrian by birth. In fact, the credit goes to an Austrian officer, August Zang, who opened the first Viennese bakery in Paris in the nineteenth century. This is why sweet pastries made from fermented dough are known in French as viennoiserie.
The first recipe for a croissant made with yeasted puff pastry (pâte feuilletée levée) was published in 1905 by Auguste Colombié, a leading authority on gastronomy in his day.
Before you start
Recipe cost: €14
Prep time: 14.5 hours over 4 days
Difficulty: hell on Earth
Ingredients
Makes about 10 croissants, 80 g each
Pre-ferment
50 g water
3 g fresh yeast
80 g strong white bread flour (≥ 11% protein), such as Ariana
1 g salt
Dough
325 340 g Kerrygold® unsalted butter (40 + 300)
11 g salt
50 60 g granulated sugar
220 g strong white bread flour
300 g plain flour (≤ 10% protein)
22 18 g fresh yeast
14 g raw honey
12 g milk powder
130 g cold whole milk
135 g cold water
For brushing the croissants
2 eggs (1 whole egg + 1 egg yolk)
2 g salt
50 g sugar
50 g water
For the chocolate croissants
15 g Nutella® per croissant
8 g Hacendado® chocolate sprinkles per croissant
Equipment
Stand mixer
kitchen thermometer
Wooden rolling pin
1 cm and 0.5 cm guide sticks
Baking parchment and cling film
Ruler or tape measure
Flexible spatula
Metal dough scraper
Very sharp knife
Disposable piping bag and reusable piping bag (the latter is stronger)
8 mm filling nozzle
Pastry brush for removing excess flour and applying the syrup
Artist’s paintbrush for applying the egg wash (more delicate)
25 × 30 cm zip-lock freezer bags or 22 × 35 cm sandwich bags (for the ice packs)
8 ice packs made from disposable ice-cube bags enclosed in freezer bags (remove the zip fasteners)
For a homemade proofing chamber
Dimensions: 88 × 60 × 45 cm
Plastic-sheet door
Two heat mats, 25 × 50 cm and 50 × 50 cm
85 × 68 cm perforated metal sheet
Four 11 × 37 × 10 cm containers (three will support the metal sheet; one will hold the water)
Recipes consulted
Aïda Ben, Apprendre la pâtisserie française (1)
Aïda Ben, Apprendre la pâtisserie française (2)
Amaury Guichon, La Pâte de Dom
Anonymous, Foodie Findings
Claire Saffitz, NYT Cooking
JP Darwel, No BS Baking
Master Pastry Chef Daria, Vincenzo’s Plate
Ricardo Burgos Canal de Cocina (1)
Ricardo Burgos Canal de Cocina (2)
Pre-ferment by Svitlana Popivnyak, Recetas de Esbieta
Xavier Barriga, Las recetas de MJ

Making croissants requires a thorough understanding of fermented and laminated doughs, which I lack. Despite going to great pains to learn the process, my croissants still aren’t rising properly. It’s the kind of thing you might want to make once, just to see how much faff it is, then never consider again.
About 30% of the dough ends up as trimmings. Rather than throwing them away, you can gather the trimmings together, as Ricardo does, and use them for another bake.
The ideal room temperature during preparation is 18°C.
This recipe is made over four days and is designed so that the croissants are ready in the morning.
Traditionally, croissants are laminated using one of the following methods: (i) three single turns; or (ii) one double turn and one single turn. This recipe uses the second combination. Three single turns produce a greater number of finer layers, but when laminating by hand it is better to prioritise a more open, pronounced honeycomb structure inside.
If you would like to know how many alternating layers of butter and dough are created in laminated pastry, you can find out here. This croissant dough has 25 layers.
Finally, if you are interested in the professional method used to calculate croissant ingredients, you can discover the secrets here.
Day 1. 20:00. Preferment (Process time: 1½ hours)
A pre-ferment is a portion of dough prepared in advance to encourage flavour development and improve the keeping qualities of the finished product.
- Heat the water to 35°C (about 15 seconds in the microwave).
- Crumble the yeast into the water and dissolve it with a whisk.
- Add the flour.
- Add the salt. Mix until the dough is uniform, then shape into a little ball.
- Leave to rest at room temperature for 1 hour, covered with cling film.
- Degas the dough by gently pressing the palm of your hand onto the surface to release the carbon dioxide produced during fermentation. Shape back into a little ball.
- Cover and refrigerate in a container for 24 hours.
Day 2. 22:00. La détrempe | base dough (Process time: 2.5 hours)
- The less the dough is worked at this stage, the flakier it will be; conversely, the more it is worked, the harder it will be to laminate and the more it will resemble a fermented dough.
If the dough starts to look dry towards the end, mist it with water while rolling it out and allow the flour to absorb the water during the resting period.
- Make the butter block (beurrage): prepare an envelope from a sheet of baking parchment as shown in figure 4. Dust 300 g cold butter with flour, beat and roll it out to form a longer, thinner block. Wrap it in the parchment and close the parcel. Finish by rolling and smoothing the parcel with the rolling pin. Refrigerate.
- Fraisage (mixing the ingredients before kneading): add the cold water and milk, salt and sugar to the bowl of the stand mixer.
- Sift the flour over the top.
- Add the honey, milk powder and crumbled yeast. Mix with the dough hook for 2 minutes on the lowest speed.
- Cover the mixer bowl with a damp cloth and leave to rest for 10 minutes to allow the flour particles to hydrate.
- Start the mixer and add 40 g diced butter. The butter should have a similar consistency to the dough.
- Add the pre-ferment.
- Knead for another 4 minutes, then knead by hand until the gluten is about 70% developed. The dough should pass the windowpane test: a piece should stretch until translucent without tearing.
- Shape the dough into a ball as Amaury Guichon does.
- Score a cross in the top, place it in a container and cover with cling film (or a shower cap reserved exclusively for this purpose).
- Leave the dough to rest in the switched-off oven for 30 minutes.
- Degas.
- Place the dough in a bag measuring 22–25 cm square and roll it out to make it as rectangular as possible. The dough should be no more than 5 cm thick so that it cools quickly and fermentation slows.
- Freeze for 30 minutes, then refrigerate for a minimum of 6 hours and a maximum of 16 hours. During this rest, organic acids develop, the dough becomes more extensible and the gluten loses tension.
Day 3. 06:30. Le tourage | enclosing the butter (Process time: 2.5 hours)
- It is essential to use a light rolling pin so that its weight does not damage the layers. The dough should roll out smoothly with gentle, even pressure.
- The dough can dry out very easily. Before leaving it to rest, place it on a tray, cover it with cling film and a damp cloth, then wrap the tray in a bag.
- Work quickly.
- Check frequently that the dough block is not sticking to the work surface.
- However, use as little flour as possible to prevent the dough from drying out.
- To turn the dough over, roll it around the rolling pin and unroll it upside down.
- If any butter breaks through to the surface, dust the area lightly with flour to contain it.
- If bubbles form, prick them with a cocktail stick.
- Apply pressure with the rolling pin in one direction only, working from the centre towards the ends. First press gently at short intervals, then apply even pressure (figure 5).
(Dough temperature: 7°C | Butter temperature: 9°C)
- On a lightly floured surface, once the dough block is pliable, roll it out into a rectangle proportionate to the butter block, approximately 23 × 42 cm (figure 5). Use the 1 cm guide sticks to achieve an even thickness and square corners.
- Brush off any excess flour, place the butter in the centre and cover it with the dough (figure 6).
- Join the edges and seal the dough block completely.
Lamination and fold 1: double turn / book fold
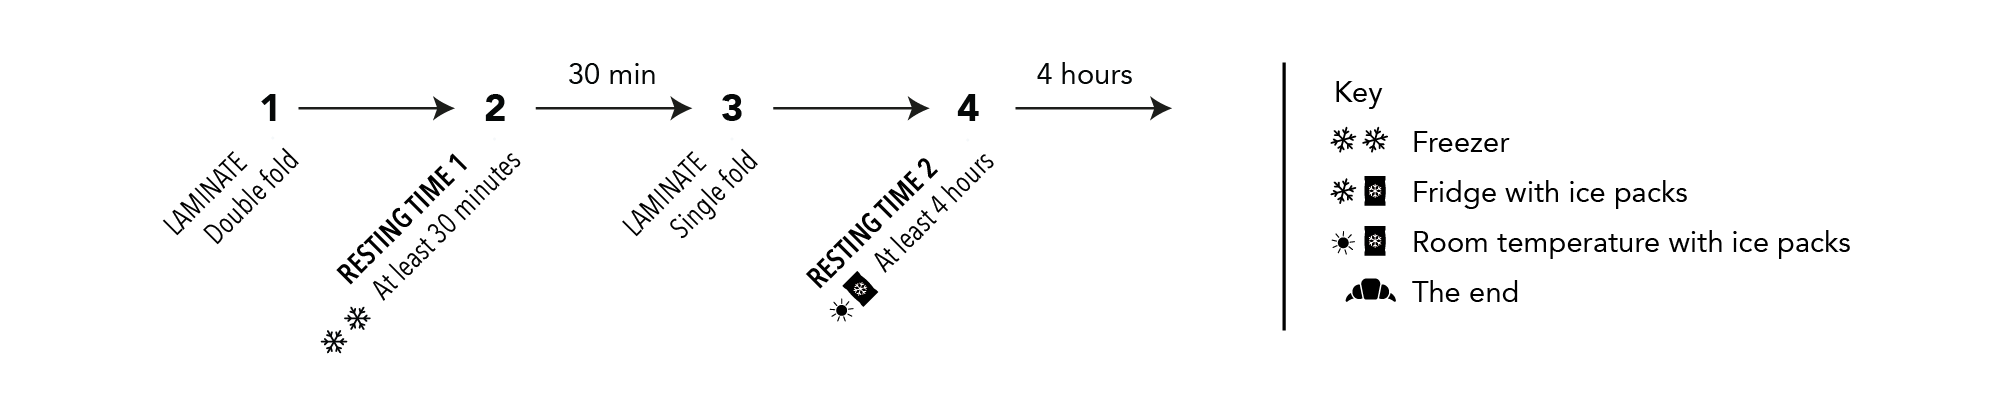
Figure 1. Resting schedule during lamination. Source: author’s own.
- The aim is to roll the dough into a rectangle four times as long as it is wide and 6–8 mm thick. The ideal length is 80 cm (figure 7).
- Roll the dough block in the direction of the seam, working from the centre towards the ends and then across the width (figure 7).
- Begin by tapping the dough, then press gently and evenly.
- Once the dough has reached the correct dimensions, brush the surface to remove any excess flour.
- Trim all four sides.
- Fold one end of the dough over one third of its length. Bring the other end up to meet it (figure 8). Remove any excess flour before and after each fold.
- Fold the dough in half, like closing a book (figure 8).
- Even out the dough by pressing gently and evenly with the rolling pin, then roll it out slightly to make the next fold easier.
- Leave the dough to rest in the freezer for at least 30 minutes, wrapped as described above.
Lamination and fold 2: single turn / three-fold
- The aim is to roll the dough into a rectangle three times as long as it is wide and 6–8 mm thick (figure 9).
- The seam should be on the right-hand side of the dough block. Roll it out lengthways, from the centre towards the ends, then across the width (figure 9).
- Once the dough has reached the correct dimensions, brush the surface to remove any excess flour.
- Trim the shorter ends.
- Fold the sheet into thirds, as you would fold a letter (figure 9). Remove any excess flour before and after each fold.
- Even out the dough by pressing gently and evenly with the rolling pin, then roll it out slightly to make the next step easier.
- Freeze for 30 minutes, then refrigerate for 5 hours with ice packs on top, replacing them halfway through the resting time. Place another two ice packs underneath the tray; these do not need to be replaced.
- Stack the trimmings neatly in a bag and refrigerate. You can also freeze them to stop the fermentation process.
Day 3. Détaillage et façonnage | cutting and shaping (Process time: 3.5 hours)
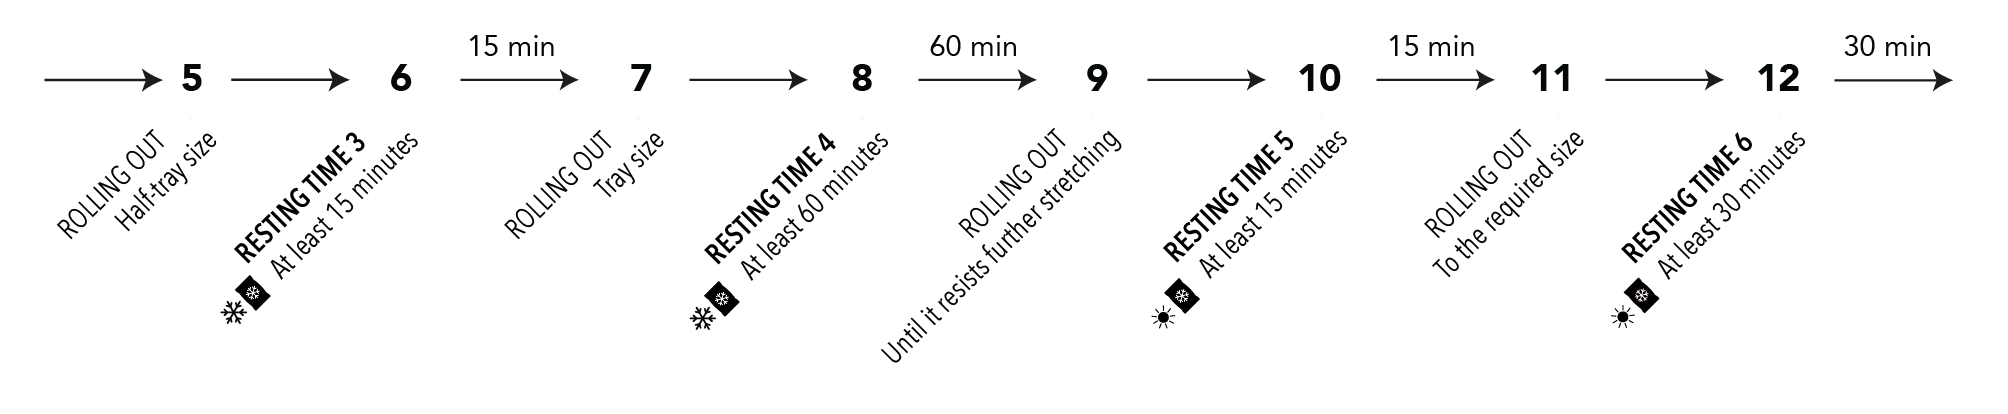
Figure 2. Resting schedule during rolling. Source: author’s own.
- Lift the dough gently at the sides and let it fall back onto the work surface to aerate and relax it.
- Because the dough is rolled thinly, considerable tension develops. It needs to be rested repeatedly, taking care not to allow fermentation to begin.
(Dough temperature: 1°C)
- Leave the dough to rest at room temperature, covered with a damp cloth, for about 20 minutes until it reaches the right consistency.
- The seam should be on the right-hand side of the dough block, then roll it out lengthways.
- The aim is to achieve a thickness of 5–6 mm and a width of about 25 cm. The length will vary.
- Once the dough has reached the right dimensions, following the recommendations shown in figure 2, leave to rest for 30 minutes with ice packs on top, protected with cling film.
- Trim the longer edges to expose the layers and make them straight.
- Make notches every 4.5 cm along both sides and cut triangles by connecting alternate notches (figure 10).
- Make a 3 cm cut in the base of each piece with the metal dough scraper.
- Shape the croissants (figure 11). Brush off any excess flour, then stretch each triangle with the base resting on the worktop, pulling the narrow tip so that it lengthens by a few centimetres.
- Roll gently from the base towards the tip.
- Freeze the croissants. Some authors claim that this strengthens the gluten and improves the final result. In any case, it stops fermentation and allows the croissants to be stored until the day of proofing and baking.
Prepare the syrup: heat the water and sugar. When small bubbles begin to form, continue heating for 5 minutes, then set aside.
For the chocolate croissants, transfer about 100 g of Nutella® to the disposable piping bag fitted with the filling nozzle. As the spread is thick and the nozzle narrow, place the bag inside the stronger reusable piping bag for emotional support.
Day 4. La pousse or l’apprêt | proofing (Process time: 3.5 hours)
- Humidity should not exceed 80%. The ideal level is 75%.
- The proofing temperature should not exceed 28°C. The ideal temperature is 23–25°C.
Proofing in a homemade chamber

Figure 3. Proofing and baking schedule. Source: author’s own.
- (Chamber temperature: ±20°C | Humidity: ±60%). Arrange the frozen croissants on baking parchment in the proofing chamber and mist with water.
- Bring 300 ml of water to 50°C: boil half of it and mix it with the remaining room-temperature water.
- Set the heat mat to 23°C.
- Check the croissants after 1 hour 30 minutes and continue proofing until they reach the correct stage. (Room temperature: ±24°C | Humidity: ±70%). To check: they should have increased considerably in volume, feel light, wobble when the tray is moved gently and show clearly defined layers. When pressed gently, the indentation should remain slightly visible. The timings that follow will depend on whether the croissants are properly proofed.
Day 4. La cuisson | baking (Process time: 1½ hours)
- Bake on the second shelf from the bottom of the oven.
- Position the croissants with their backs facing the fan (figure 11).
- Prepare the egg wash: mix 1 whole egg, 1 egg yolk and 2 g salt. Pour into a sieve and allow it to drain naturally, then refrigerate.
- Preheat the oven to 220°C with top and bottom heat and the fan on, with a baking tray inside for the water used to create steam.
- Brush the croissants with egg wash. Apply a thin layer, taking care not to let it run down the sides, as this would hinder the formation of the layers.
- Once the oven has reached the correct temperature, place the croissants in the oven and immediately pour
300 ml200 ml of boiling water into the tray to create a burst of steam. - Reduce the oven temperature to 200°C.
- Bake for 2 minutes at 200°C, then for 15 minutes at 180°C.
- Once baked and while still hot:
– Plain croissant: brush with syrup and leave to cool.
– Chocolate croissant: brush with syrup and scatter with the chocolate sprinkles, taking care not to let them fall down the sides, as they would be damaged when handling the croissants. To fill: once the croissants are cold, place them on the scales and tare to zero. Fill each one with 15 g of Nutella®, inserting the nozzle at several points so that the filling is evenly distributed. Cover the holes left by the filling nozzle with more chocolate sprinkles.
Storage
Once baked, croissants are best eaten within 6 hours. Frozen before the final proof, they will keep for 1 week.

Figure 4. Folds in the parchment used to prepare the butter block. Source: author’s own.
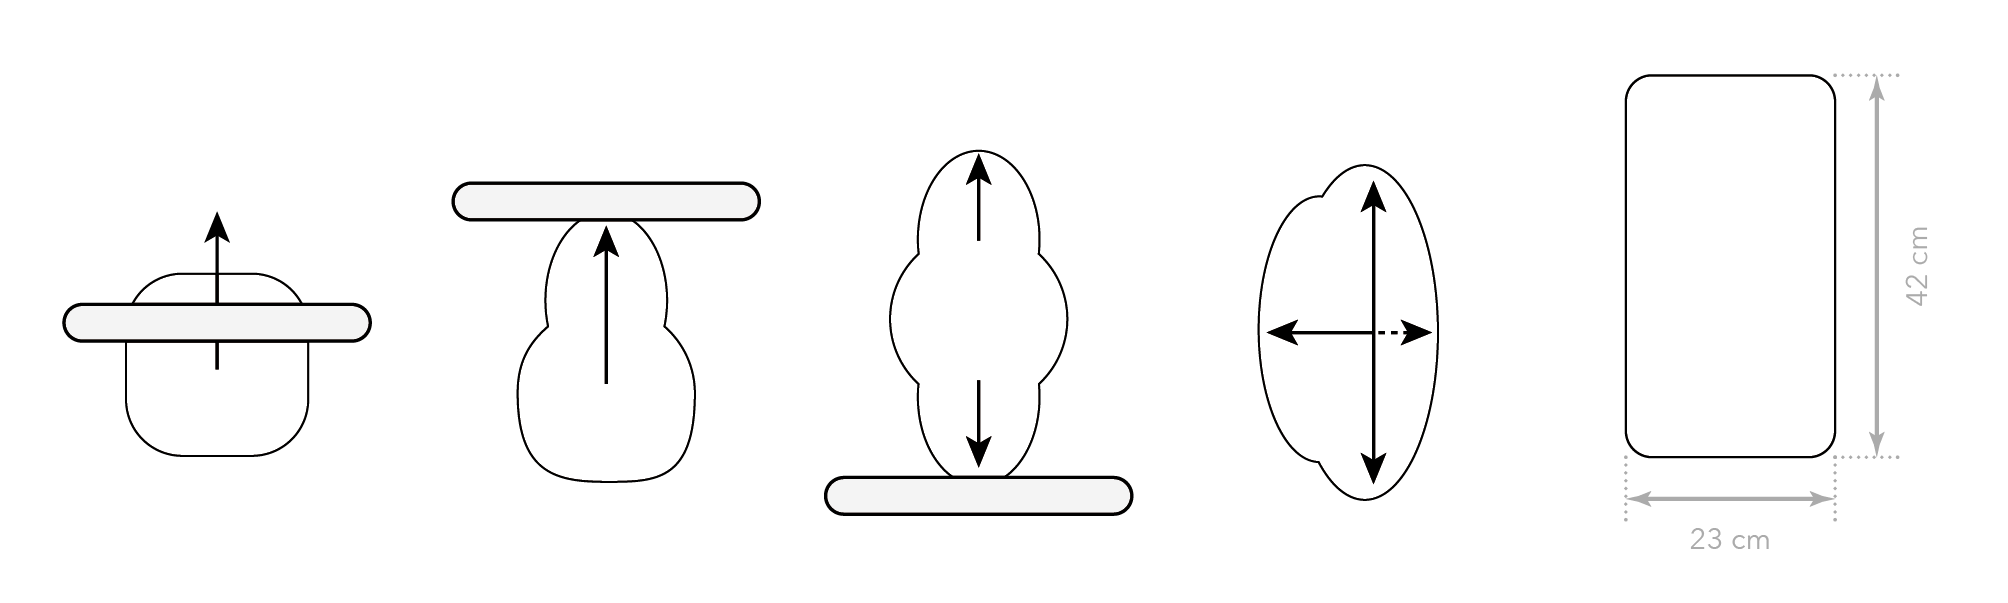
Figure 5. How to roll out the dough for lamination. Source: author’s own.
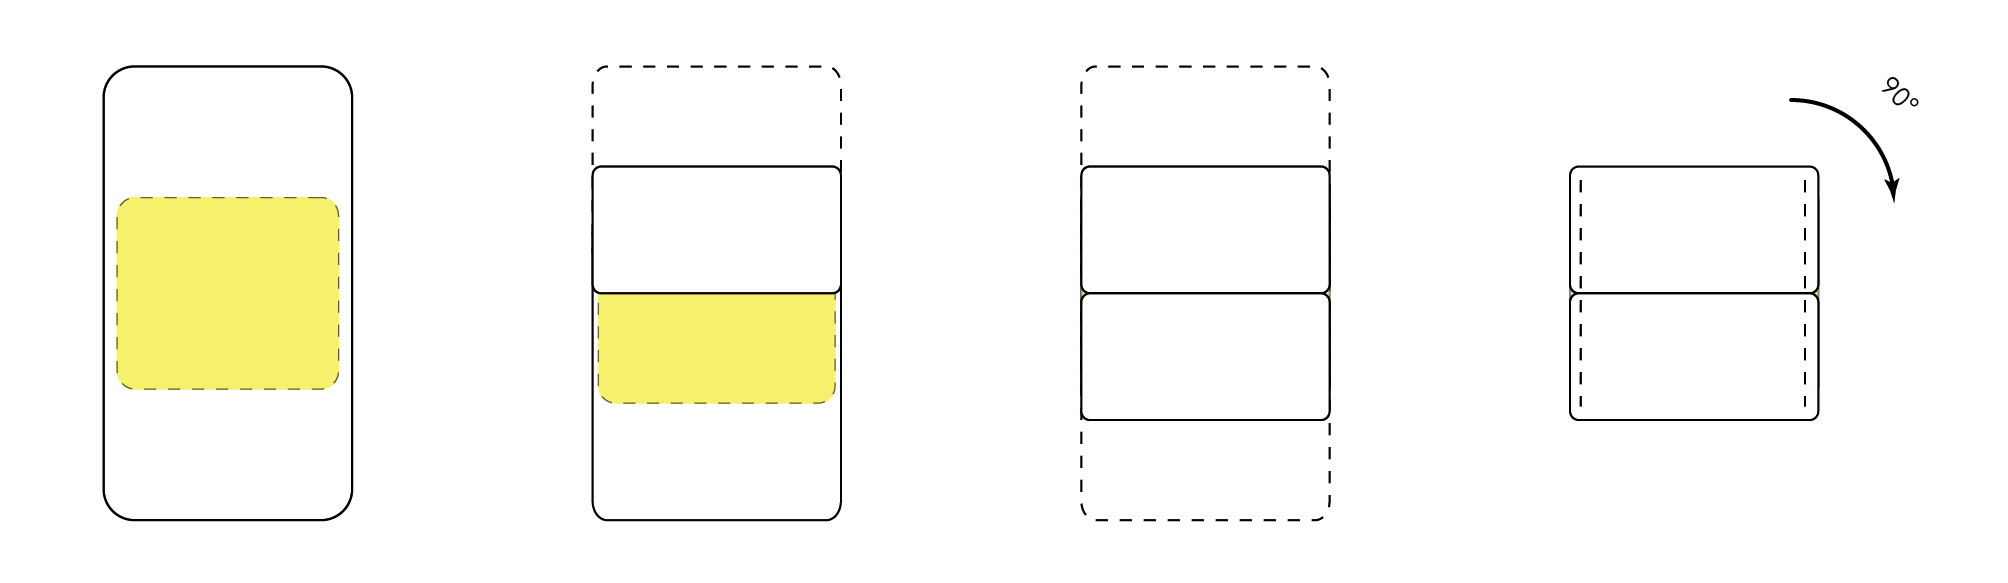
Figure 6. Enclosing the butter. Source: author’s own.
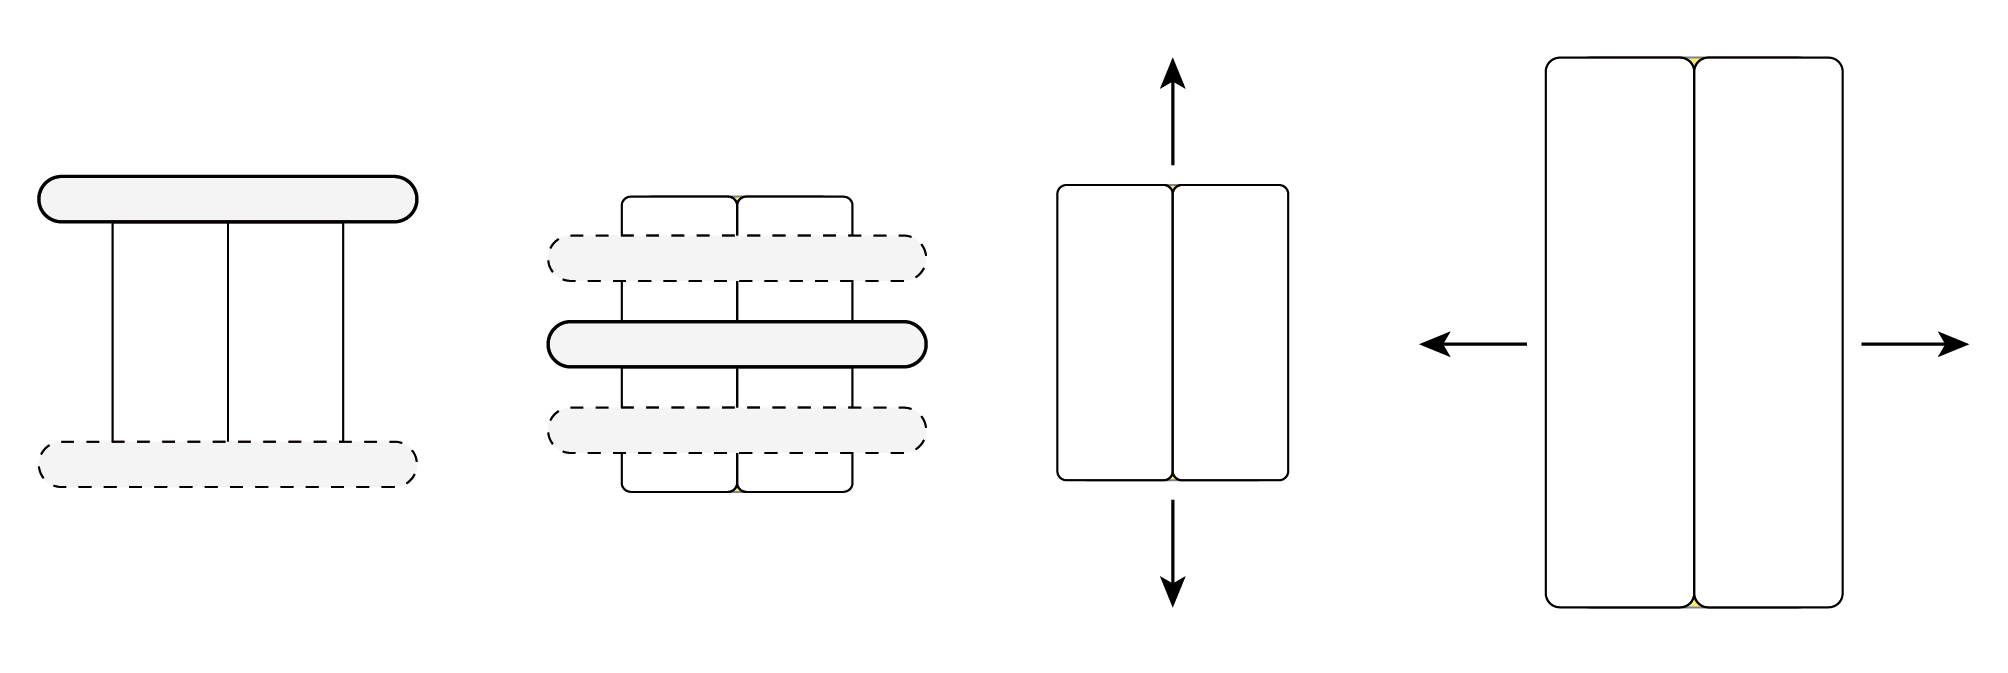
Figure 7. How to roll out the dough after enclosing the butter. Source: author’s own.
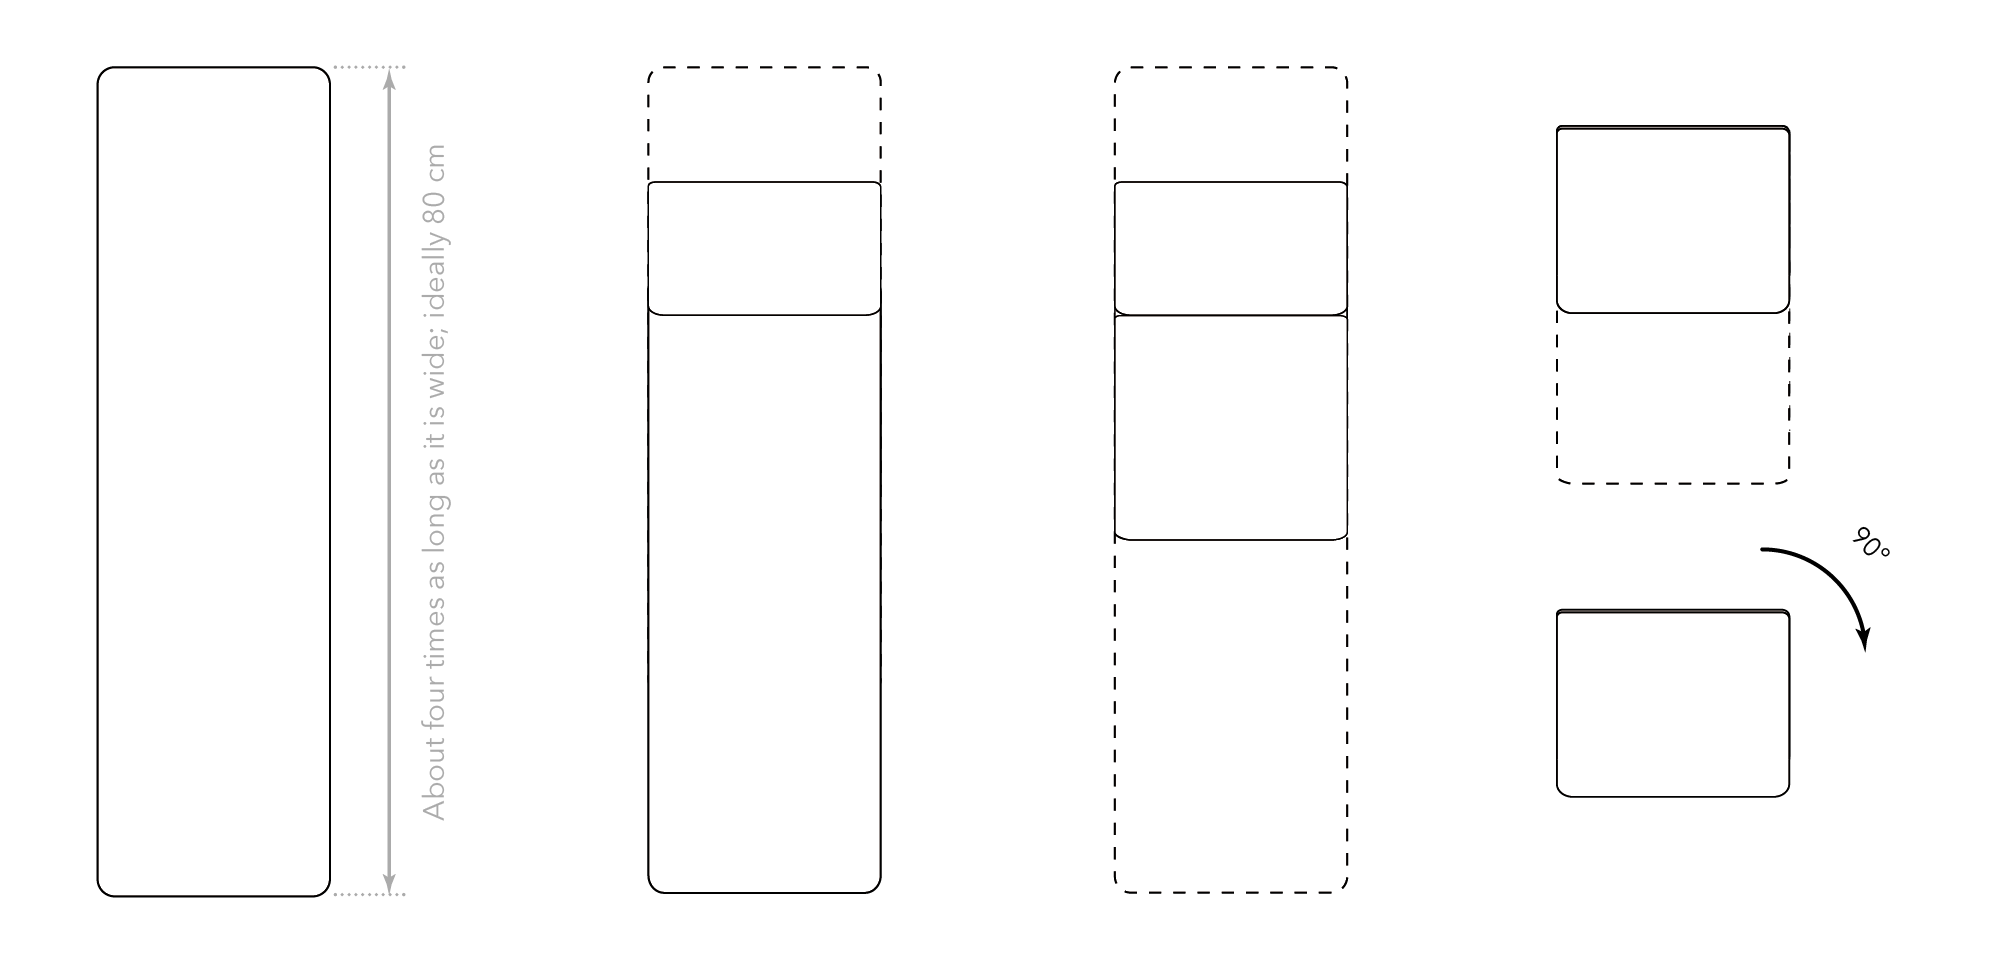
Figure 8. The first lamination uses what is known as a double turn or book fold. Source: author’s own.
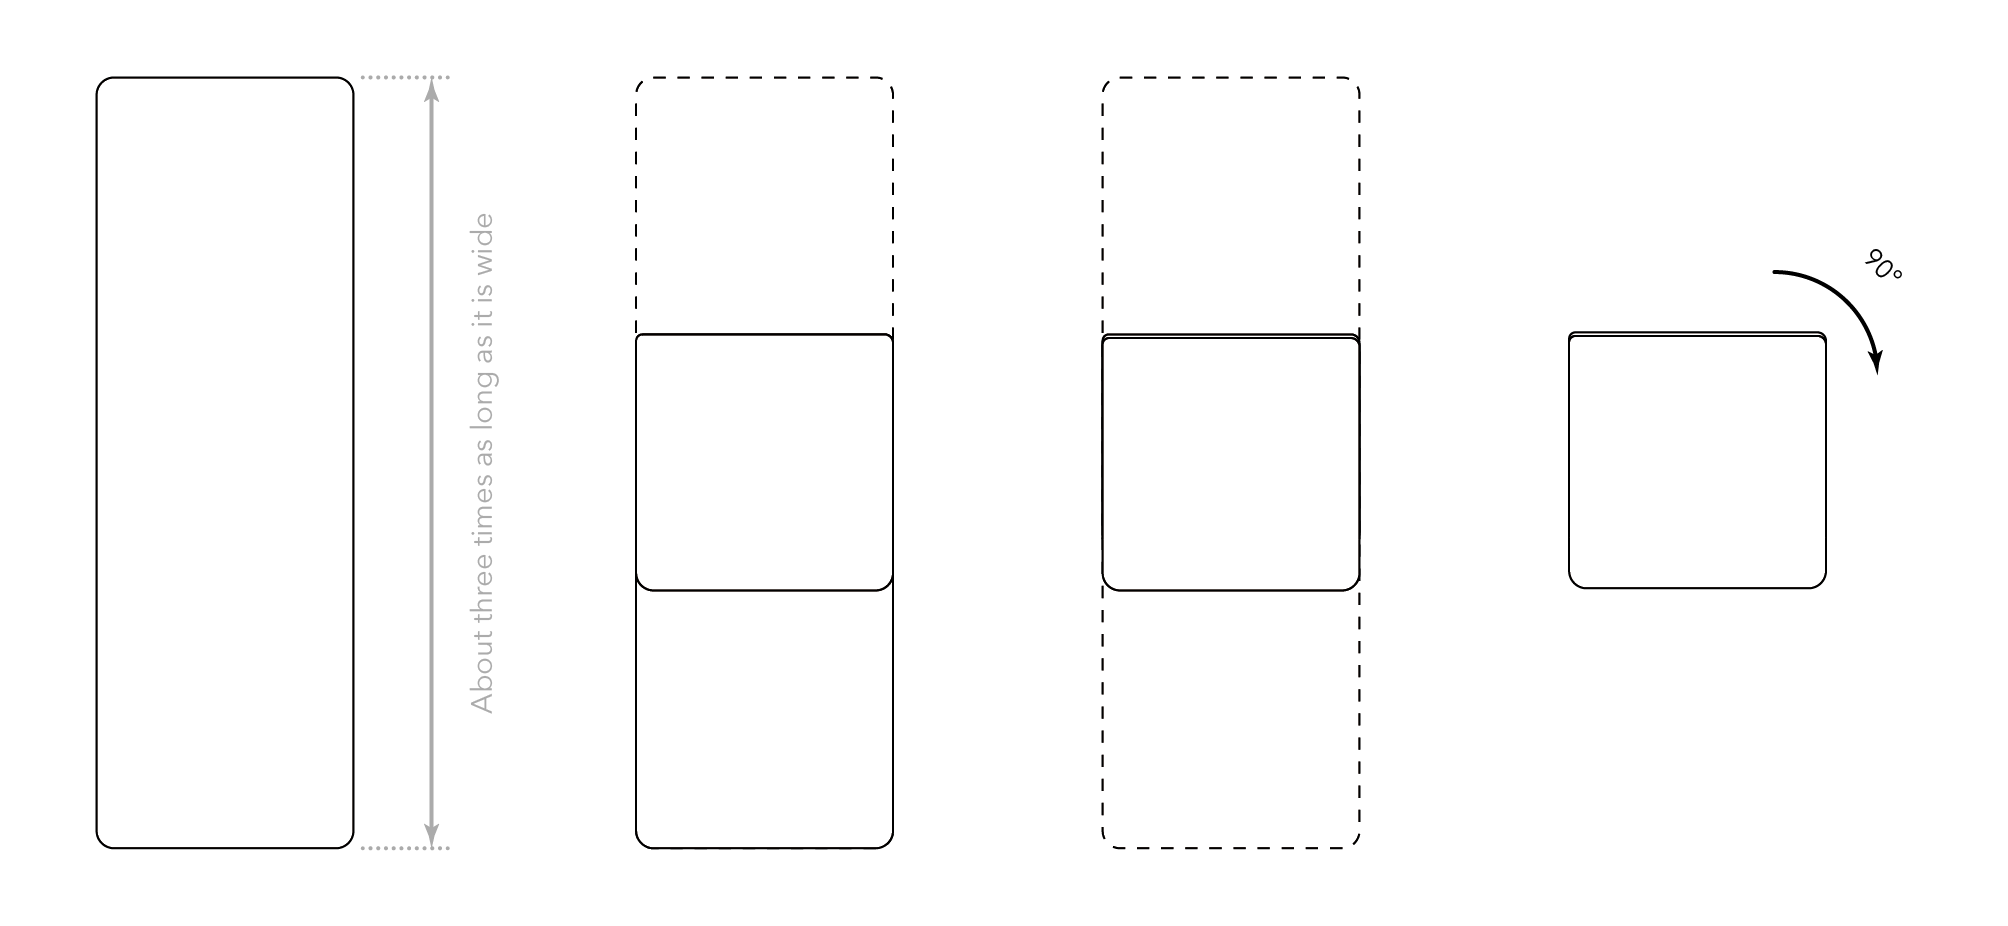
Figure 9. The second lamination uses what is known as a single turn or three-fold. Source: author’s own.
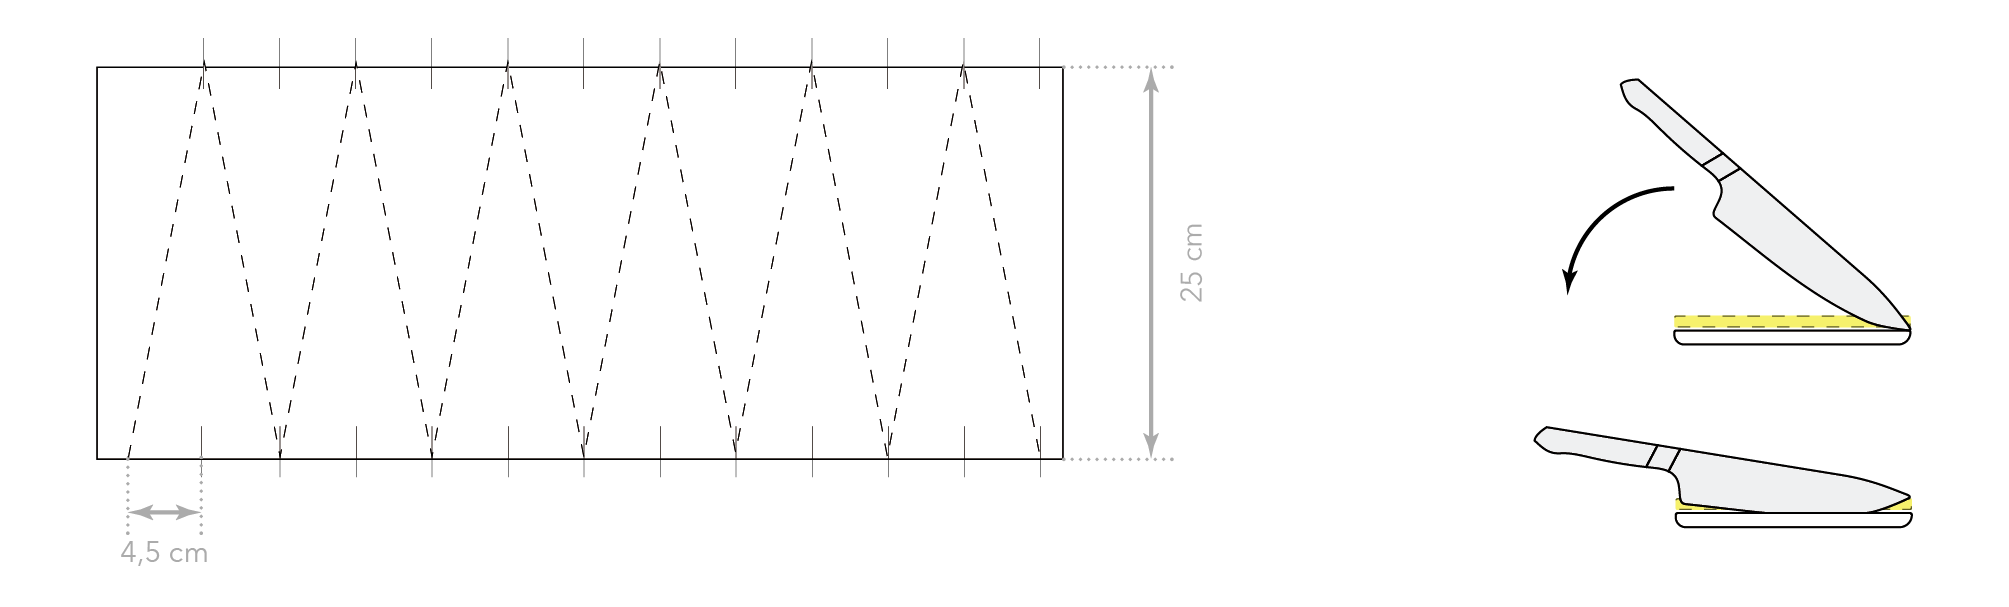
Figure 10. Cutting the dough and using the knife. Source: author’s own.
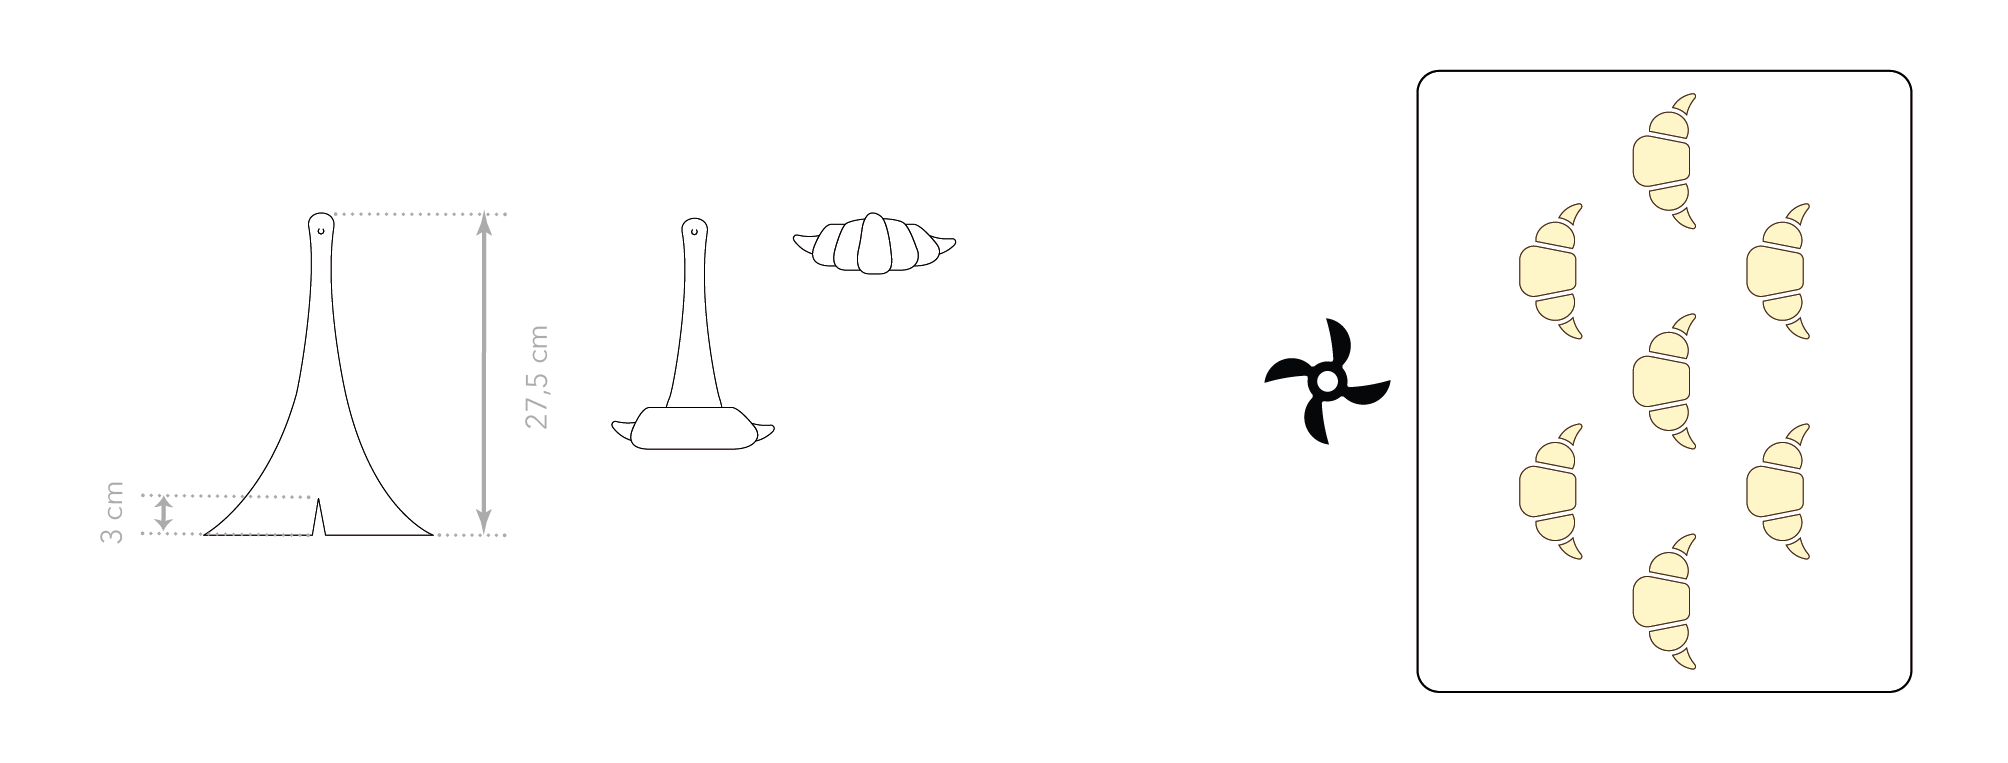
Figure 11. Shape of the croissants and their orientation in the oven. Source: author’s own.
Next attempt:
– 18 g yeast in the dough, 21 g in total. Reducing the yeast lowers the risk of overproofing.
– Try not to mist with water during lamination.
– More butter will make the dough more extensible and will also prevent the need to moisten it.
– Chilling the croissants after proofing may cool the centres too much, dry out the surface or cause the proofed croissants to lose tension. Instead, try chilling a tray for 10–15 minutes before brushing and baking them.
– Use less steam during baking.
– Although freezing the croissants is practical, try skipping this step on one attempt.